

MySql For Beginners- All You Need To Know
Now we have enough command on PHP to move one step forward and include some database knowledge with it. This tutorial will help you in learning basic queries of MySQL. We already discussed an introduction of MySQL in our very first tutorial. There is no need to repeat it. The first step towards learning MySQL is to set up it in your own computer. Since we already installed XAMPP, so we already have MySQL installed.
Writing your First Query in MySQL
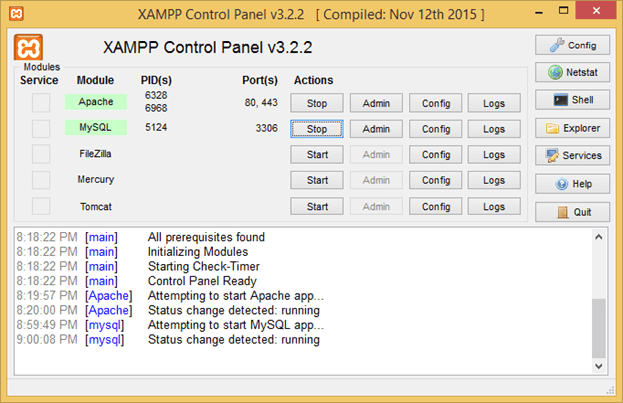
Run XAMPP control panel and make sure that MySQL is running in your PC. The window should look like this
 Next task is to get the MySQL command line open. So open up the cmd and type MySQL -u root -p. There are two possibilities now. If you see this result
![]() That means you are not currently able to run the MySQL with this command. To solve this, go to file explorer and inside C:\ drive look for the xampp folder. Inside it, a folder named MySQL will be there. Now find a folder named as bin inside it. Click on the path of this folder and copy it
That means you are not currently able to run the MySQL with this command. To solve this, go to file explorer and inside C:\ drive look for the xampp folder. Inside it, a folder named MySQL will be there. Now find a folder named as bin inside it. Click on the path of this folder and copy it
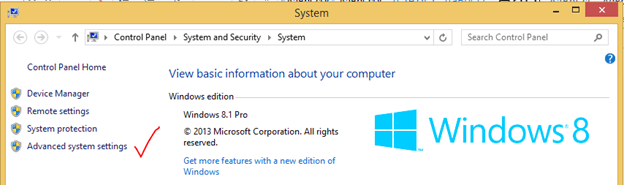
![]() Right-click on the MyPC icon and select properties. Go to advance system settings
Right-click on the MyPC icon and select properties. Go to advance system settings
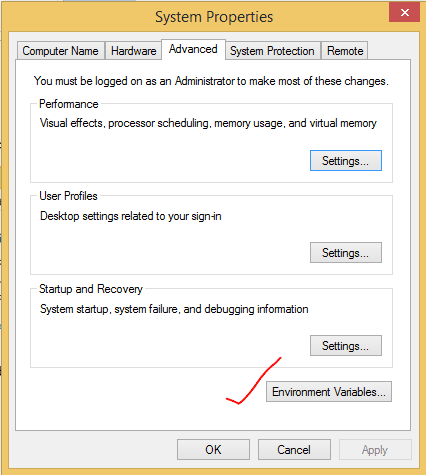
 Inside the settings, you’ll find this window, click on environment variables.
 On next window, scroll down a little bit and double click on the path. On this new window click at the end of the text and put a semicolon “;” there.
 Now paste the path you copied earlier most probably it will be C:\xampp\mysql\bin click enter. Now restart your cmd again and type MySQL -u root –p and press enter if it asks for the password press enter again. This should be the response to indicate that everything went well and now you can run any query.
 Now it is time to write your very first query here. Type “show databases;” (without double quotes) and press enter. This is a command to see all of the available databases in the system.
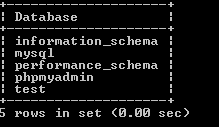 This is the option you should see. This five information_schema, MySQL, performance_schema, PHPMyAdmin and test are the names of the databases that are already created by the system.
Creating a New Database
Let’s create our own new database and call it PHP since we all are PHP lovers. Query to create this creates database PHP; Seeing the following response will mean that it went great and the new database has been created.
![]() To verify that new database actually exists, check with the command show databases; again.
To verify that new database actually exists, check with the command show databases; again.
 As you can see our new database with a name PHP has been created. Now another query is to check if there are any tables inside this database. Remember that MySQL follows a relational database model that means any data we store in this database will in the form of a table with specific rows and columns. To check for tables first we need to select one of the database type use PHP; to select our newly created database.
![]() Now we are using this database and can check for its tables. Type show tables; to check for it
Now we are using this database and can check for its tables. Type show tables; to check for it
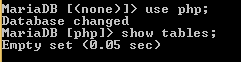 As we just created our new database, there is not any table available right now as expected.
Create a Table in MySQL
Varchar
We use this data type to store strings inside a database. It is required to insert the number of characters that each entry of this column is supposed to hold. For example, varchar(20) will allow only 20 characters to be inserted in each entry. Another substitute for this data type is char which is only used when we know that data upcoming will be of fixed size. Varchar is much more efficient in storing varying sizes of data unless the data is greater than the limit specified.
INT
As the name suggests it is used to store the integers in the table. It has a range from -2147483648 to 2147483647. We have also options for TINYINT (range -128 to 127), SMALLINT (range
-32768 to 32767), MEDIUMINT (-8388608 to 8388607) and BIGINT (-263 to 263-1). Each one can be used based on the data expected. For example, if there is a column of the age of a person we can easily store it in TINYINT without wasting storage and storing it in INT or BIGINT.
NOT NULL
This is basically not a data type instead it is an indicator that makes sure that value inside a column cannot be null. We need it when we are handling with mandatory fields like if there is a student table with a name column, so it cannot be null as every student has a name.
Using these basic data types, let’s create a new table. Write this query.
Create Table myTable (Name Varchar(20) NOT NULL, Age TINYINT NOT NULL, Message Varchar(100));
As you can see this query starts with create table command, then there is a name for the table (could be any name). After that, we define the column names by mentioning the name of a column first and then its data type and finally if there is any constraints or not like NOT NULL etc. Executing this query will look like
 Hurray!!! We just created our first table inside our database. To verify,
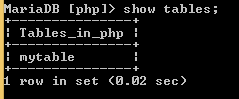 As you can see our newly created table is listed here. In case we forgot the syntax of the table, there is a command to check what kind of data we can store in this table. The command is “describe tableName;”.
 That’s it for today In our next tutorial we will link a web page to a database using PHP and make some changes in it while coding in PHP. So, stay in touch and never forget to give your feedback. Happy Learning.
Part One: HOW TO RUN YOUR FIRST PHP SCRIPT ON WINDOWS
Part Two: BASICS OF HTML5 ON THE WAY TO PHP LEARNING
Part Three: PHP WORKING WITH DATA TYPES AND VARIABLES
Part Four: IF ELSE STATEMENTS AND ARITHMETIC OPERATIONS IN PHP
Part Five: TUTORIAL ON TYPES OF LOOPS IN PHP – PHP LOOP TYPES
Part Six: INDEXED AND ASSOCIATIVE ARRAYS IN PHP
Part Seven: FUNCTIONS IN PHP
Part Eight: INTRODUCTION TO MYSQL
Part Nine: CONNECTING MYSQL DATABASE PHP
Part Ten: FORMS IN PHP – PHP FORM EXAMPLE WITH DATABASE
Main Image Source : Pixabay
Also See : Supercharge Your Freelance Career
How Do You Choose The Best Model In Machine Learning?


